
How to Complete Tactic Mapping
See also: Tactic Mapping FAQ
Overview
Upwave's platform allows you to create powerful Cuts and Cut Categories that surface Reach and Lift metrics by placement-level dimensions (such as Audience, Environment, Geo, etc.) and creative-level dimensions (such as Creative Concept, Banner Size, etc.).
Fig. 1: Below is an example of the Cut Category "Placement Type" which includes the following Cuts:
CTV
Desktop Display
In-App Display
Linear TV
Mobile Video
Pre-Roll Desktop Video
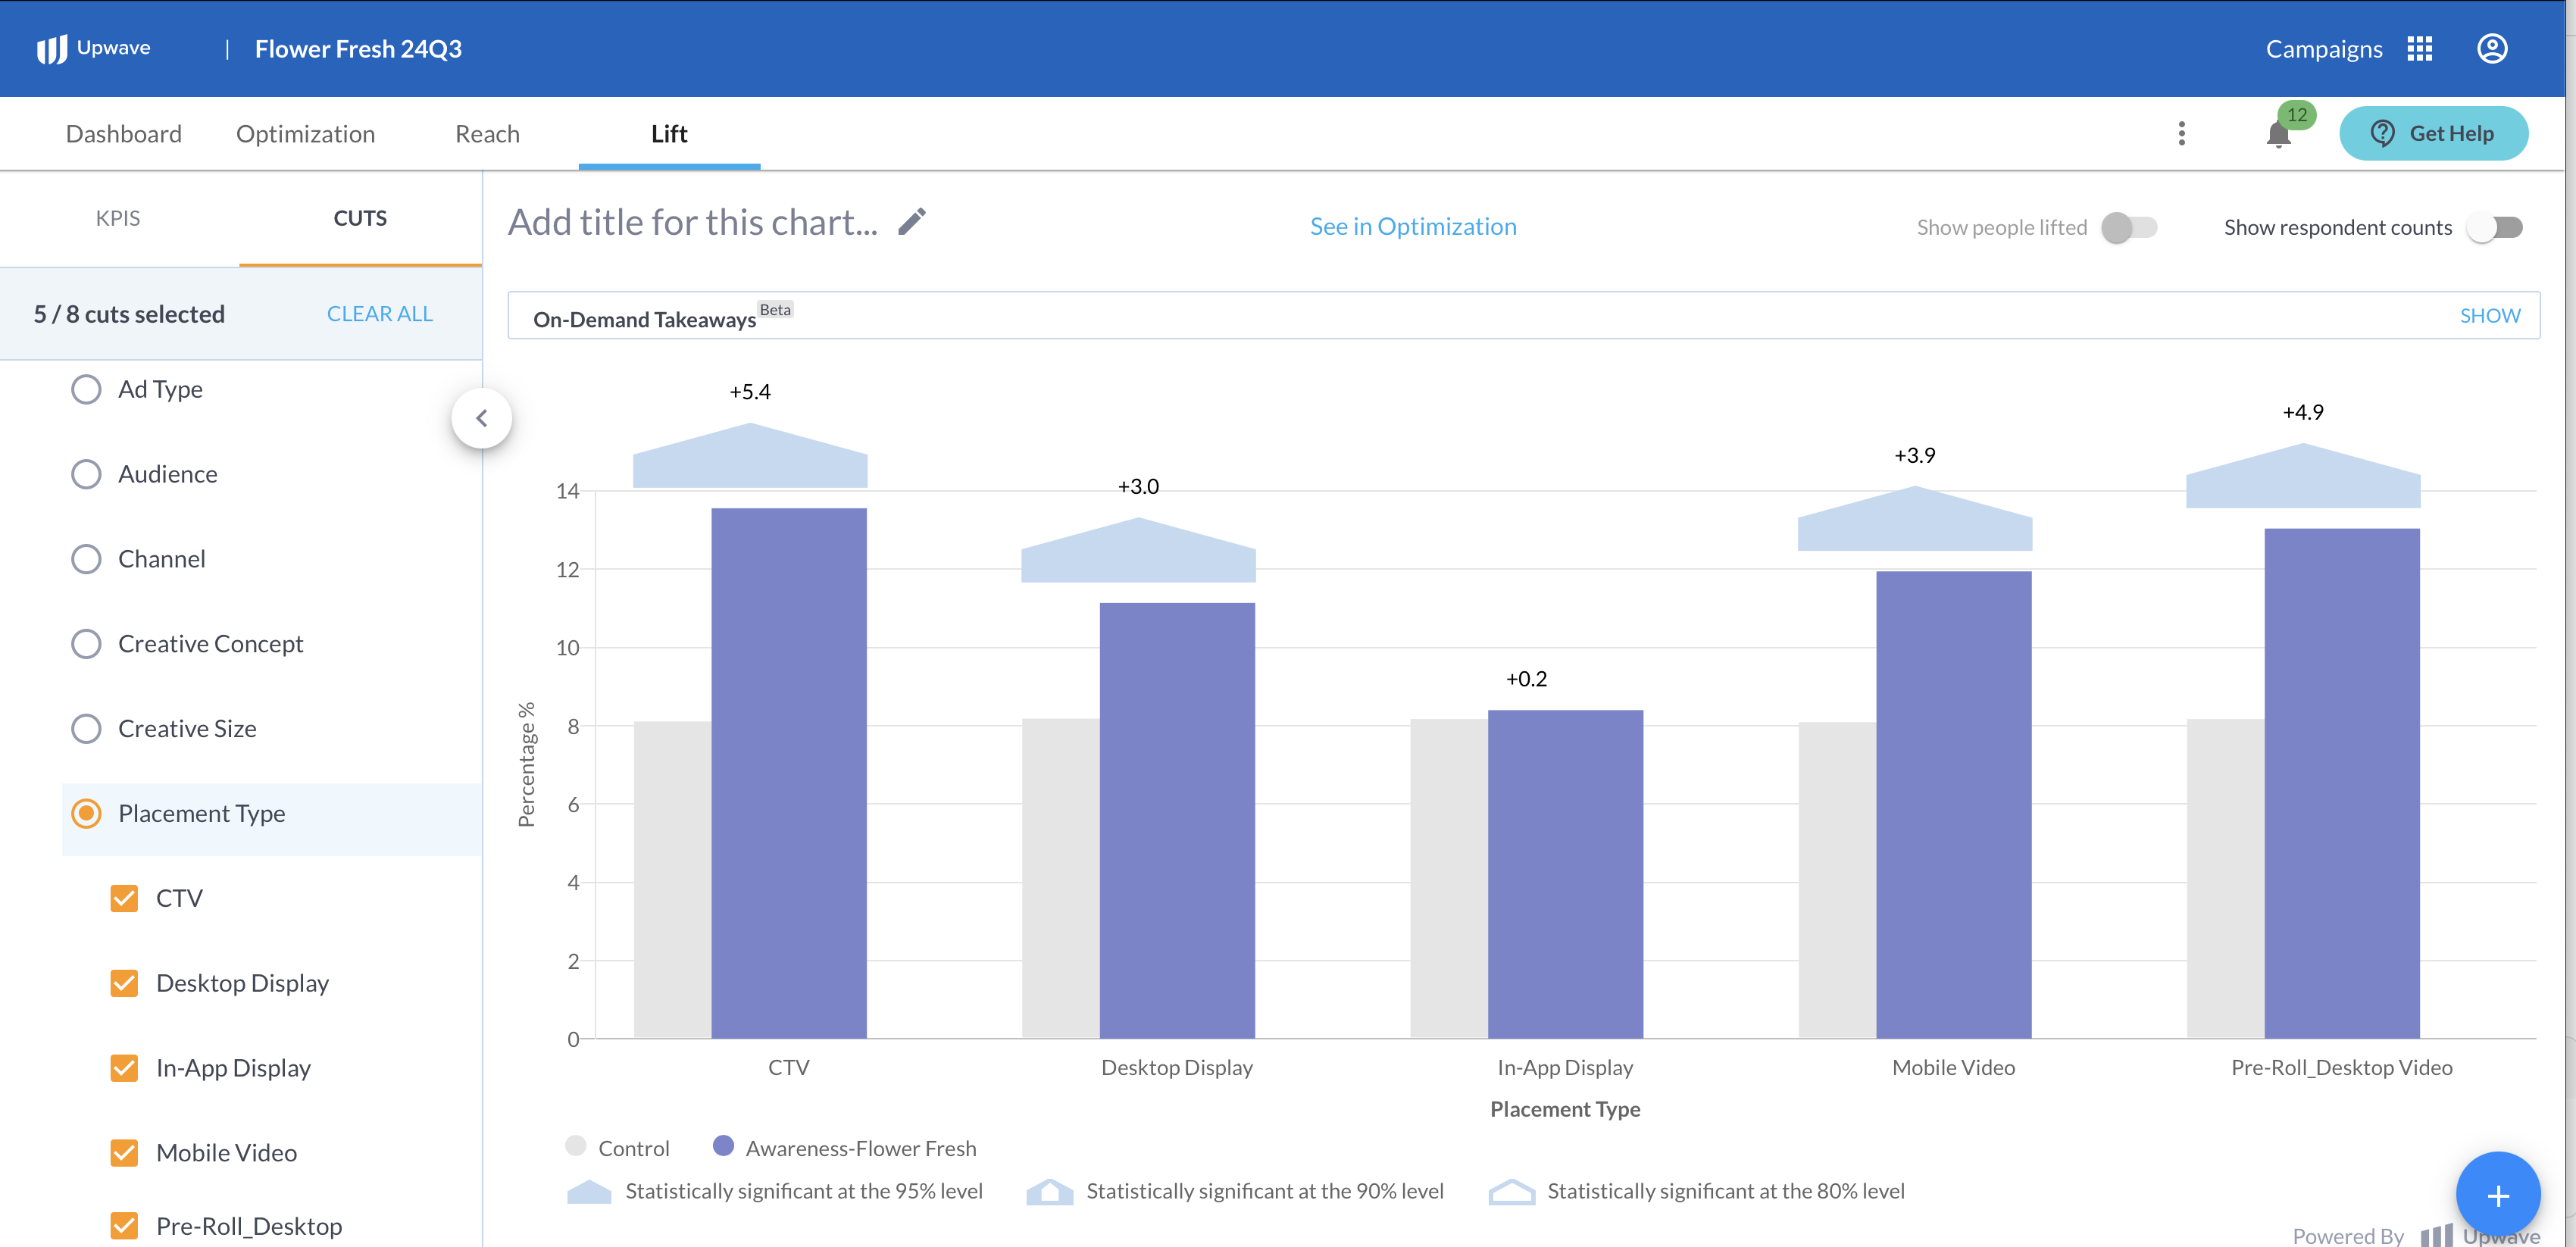
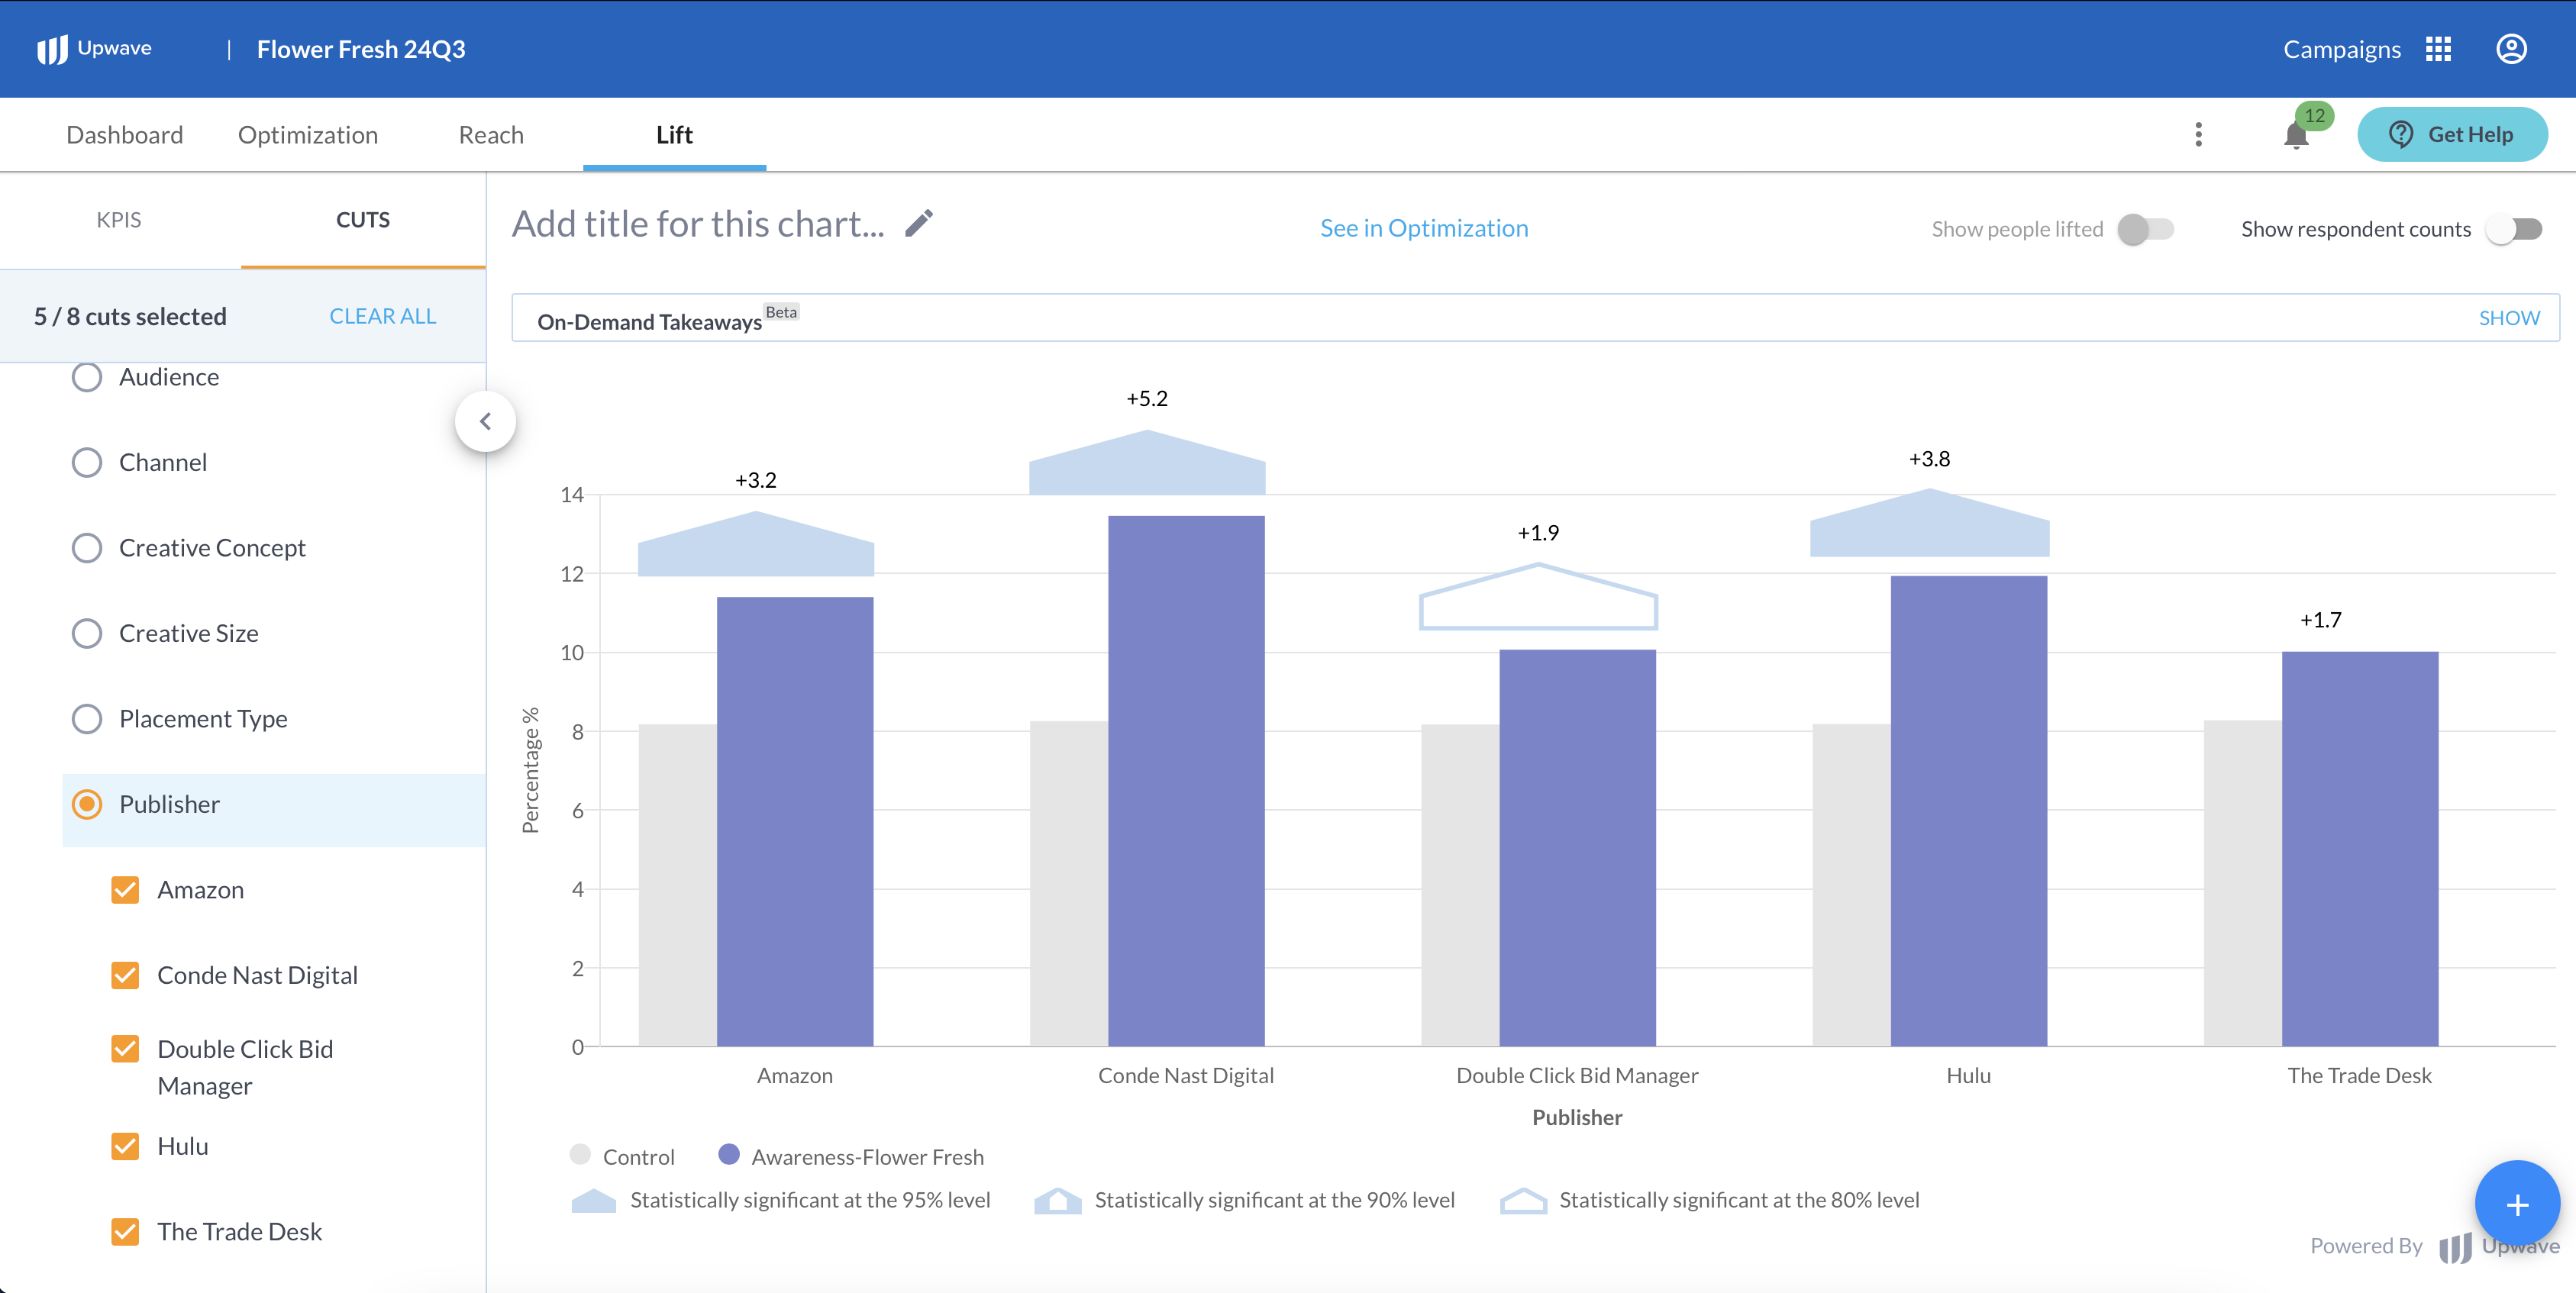
Fig. 2: Below is an example of the Cut Category "Publisher" which includes the following Cuts:
Amazon
Conde Nast Digital
Double Click Bid Manager
Hulu
The Trade Desk
How It Works
By implementing the Upwave tag, we're able to identify unique IDs (such as Placement IDs and Creative IDs) from which we 'map' exposed respondents. Let's take a look at what an Upwave tag looks like. Below is an example of a DFP/GAM tag, which includes that ad server's default macros for Creative ID, Placement ID and Site ID:

The IDs that flow through your first 2 macros are what we map your tactics to:
Macro position #1: Mapped to Creative-level Dimensions such as Creative Concept, Banner Size, etc. (in this example, the IDs that flow through
%ecid!would be mapped here).Macro position #2: Mapped to Placement-level Dimensions such as Audience, Environment, Geo, etc. (in this example, the IDs that flow through
%epid!would be mapped here).
The 3rd macro position, Site ID, is only for tag troubleshooting and is not used for mapping.
Other ad servers may use different types of IDs (such as Ad Unit IDs or Campaign IDs), but the general concept remains the same: The IDs used to map your tactics are those that flow through macro positions #1 and #2.
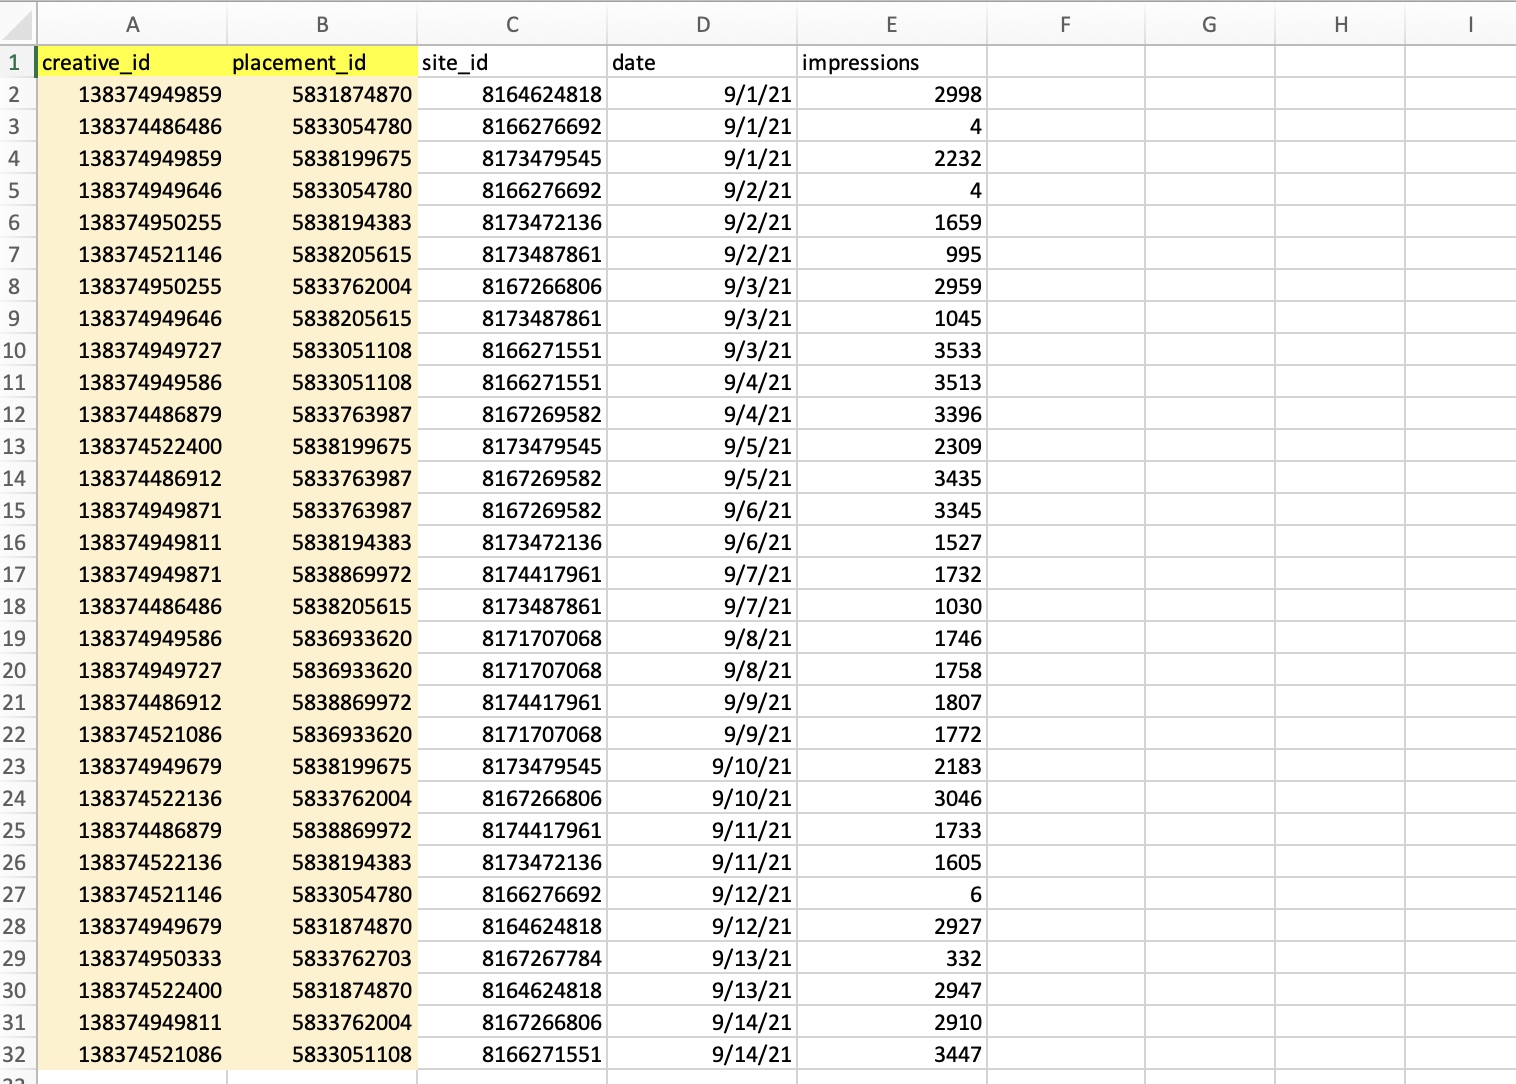
Fig. 3: Below is an example of raw data passing through an Upwave tag. As you can see, columns A:C correspond to the 3 macros within the tag. Respondents will be attributed based on the unique IDs from columns A:B (in yellow).
Instructions
Set up Ad Server Reporting
For tagged campaigns, ensure Upwave is receiving reporting for all tag(s) associated with your campaign. Below are our full reporting requirements based on the type of tag(s) you're using:
CM360-Integrated Tags: Creation, Implementation, and Reporting
Non-CM360-Integrated Tags: Creation, Implementation, and Reporting
Access Mapping Template
The Upwave platform always links to the latest version of your tactic mapping sheet from the Tactic Mapping page for the campaign.
The Tactic Mapping template is compiled of 2 things:
The IDs that the Upwave tag has received. (These are the IDs with "#" impressions listed beside them.)
For tagged campaigns: extra IDs of the same type from your ad server reporting; we include these preemptively in case impressions start tracking on them later. (These are the IDs with "0" impressions listed beside them.)
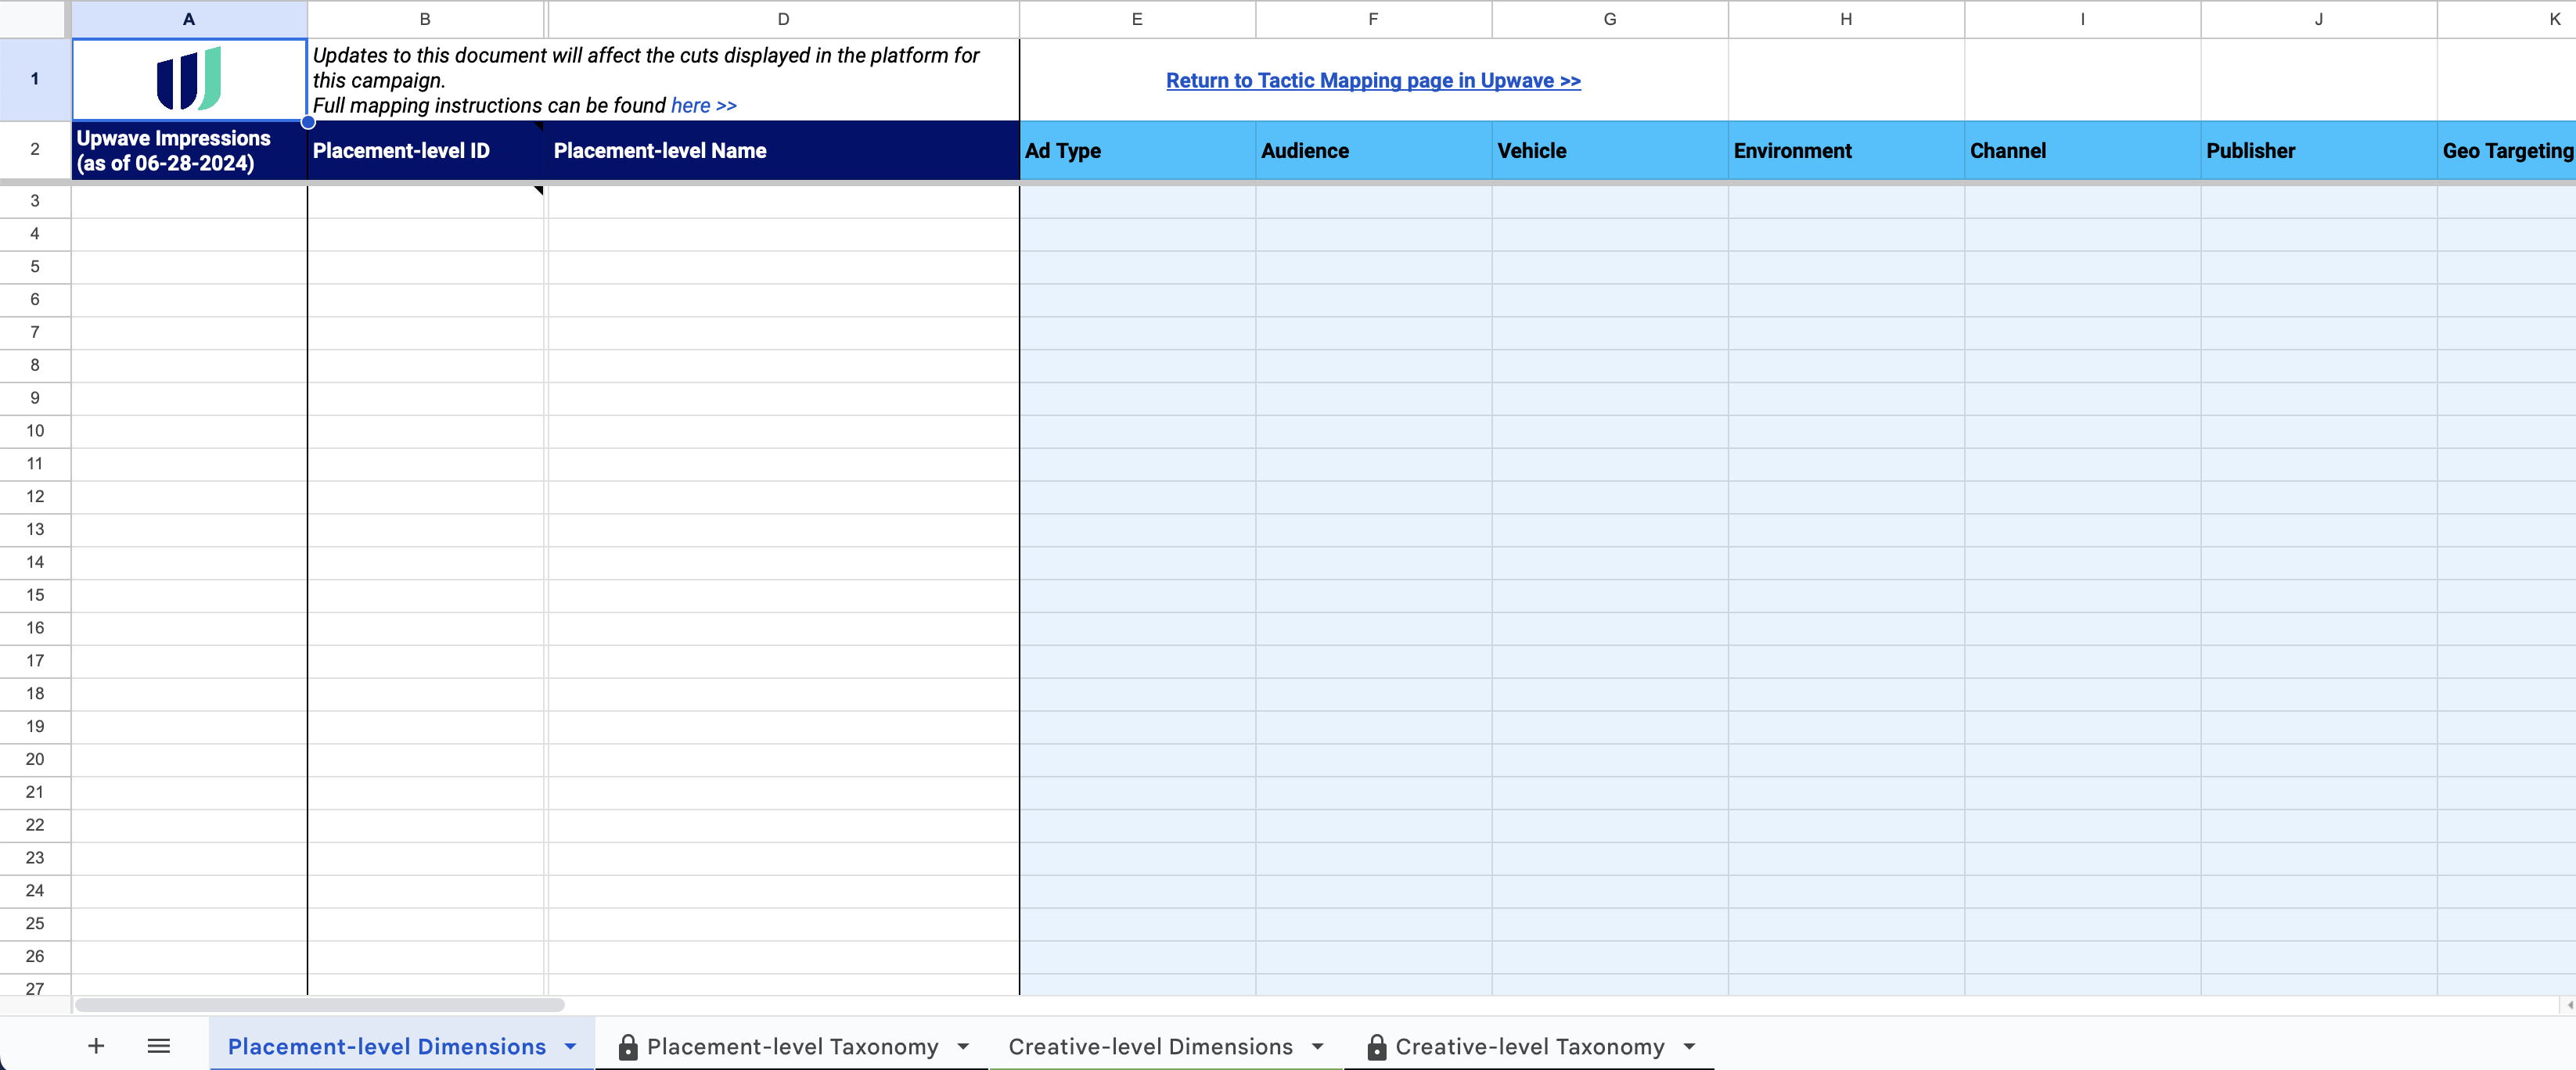
The mapping template will look like this:
Understanding your Tactic Mapping Template:
Tab Guide:
"Placement-level Dimensions": This tab will include (a) all IDs that the Upwave tag has received under macro position #2, plus (b) any excess IDs we find on your reporting that Upwave has not received impressions for (that way, if we start receiving impressions for those IDs later, mapping will already be done).
"Creative-level Dimensions": This tab will include (a) all IDs that the Upwave tag has received under macro position #1, plus (b) any excess IDs we find on your reporting that Upwave has not received impressions for (that way, if we start receiving impressions for those IDs later, mapping will already be done).
"Placement-level Taxonomy" and "Creative-level Taxonomy": This is where you'll review your Cuts and Cut Categories defined on the Dimensions tabs. Values on the Dimensions tabs will auto-populate in the Taxonomy tabs, ready for your review to reduce the risk of errors/typos.
TIP!
The IDs provided in your Tactic Mapping Template cannot be modified as they're inputted from (a) our tag, and (b) your reporting. Inputting different IDs would result in mapping tactics that would never be found.
Mapping templates are only used for mapping your tactics, not QAing your tag - though you may view the "Upwave Impressions" column in your mapping template for a quick glance of what activity we're seeing for each ID. Please refer to your Discrepancy Reports for all QA purposes.
Pre-populated Categories:
On your "Dimensions" tabs, you'll find our default Cut Categories populated at the top:
Ad Type | Indicates how an ad was placed (i.e. Display, Video, etc.) |
Audience | Indicates who you intended to reach (i.e. Frequent Shoppers, etc.) |
Vehicle | Indicates the vehicle in which the ad was delivered (i.e. Web, App, etc.) |
Environment | Indicates the device in which an ad was placed (i.e. Desktop, CTV, etc.) |
Publisher | Indicates the website on which the ad was served. |
Geo Targeting | Indicates the geolocation in which the ad was served. |
Targeting Method | Indicates the method used to target the audiences (i.e. Contextual, Behavioral, etc.) |
Creative Concept | Indicates the creative's theme or message. |
Video Length | Indicates the length of the video (i.e. 5s, 30s, etc.) |
Banner Size | Indicates the dimensions of the banner (i.e. 1x1, 300x250, etc.) |
Category 1, 2... | These columns can be used to add custom Cut Categories. |
TIP!
We input the above suggested Cut Categories - but if desired, they can be renamed or ignored. If you're leveraging our Portfolio feature, please take this into consideration if not using the same Cut Categories across Campaigns/Tags.
Map Your Tactics
First, populate your Cuts and Cut Categories:
Navigate to your 'Dimensions' tabs where Upwave has provided IDs ready for you to map.
Enter the appropriate Cut name for each Cut Category for all IDs.
If there are any IDs that you don't want mapped, simply leave them blank.
Review Your Taxonomy
Your Placement-level and Creative-level Dimensions tabs informs the values on your Taxonomy tabs. This is an important step since it ensures you're only mapping your intended Cuts - as well as removes the risk of typos which could erroneously isolate Cuts in your dashboard (see Best Practices below).
To review the Taxonomy:
Navigate to the tab on your Tactic Mapping Template for "Placement-level Taxonomy".
Review all listed Cut names and Cut categories.
If changes are needed, navigate back to the Placement-level Dimensions tab and edit the corresponding Cut or Category cell(s).
Your Taxonomy will automatically update with the latest values from the Dimensions tab.
Repeat for the "Creative-level Taxonomy" tab.
Apply Your Mappings
Once you have mapped your tactics and reviewed your taxonomy for all tactic mapping documents for a campaign:
Navigate to the Tactic Mapping page for the campaign in the Upwave platform.
Click the "Apply Mapping Updates for All" button.
Review the information in the modal, then click the "Confirm" button.
Your tactic mapping changes will be visible in your campaign dashboard the next business day. Submitting multiple requests could cause delays in your results.
Best Practices
Check the Taxonomy
As mentioned above, the Taxonomy is an important step to ensure your Cuts are grouped correctly in your dashboard. Below are some examples where Cuts would be separated in your dashboard (i.e. treated as a unique Cut) as a result of incorrect inputs, which is why the Taxonomy exists to help mitigate:
Ex. 1
In Market Car Shopper
In Market Car Shoppers
Ex. 2
Pluto
Plluto
Pluto TV
PlutoTV.com
Ex. 3
M 24-35
Men 24-35
Use Unique IDs for Unique Cuts
Cuts can only be mapped to IDs on a 1:1 basis since it's only through those IDs that our system can differentiate. This means, you can only map 1x Cut per 1x unique ID, so please ensure you're using unique IDs when trafficking your placements.
If you find yourself in a situation where you don't have unique IDs, and need to map multiple Cuts, below is how you would resolve:
Ex. 1: NOT OK!
PID
Placement Name
Environment
235874
GABM_Green_3P_NAT - Core Brand - General_CPMR_DSKT_Web_435874
Desktop Web
235874
GABM_Green_3P_NAT - Core Brand - General_CPMR_MOB_Web_435874
Mobile Web
Ex. 2: OK!
PID
Placement Name
Environment
235874
GABM_Green_3P_NAT - Core Brand - General_CPMR_DSKT_Web_435874
Desktop and Mobile Web
or:
PID
Placement Name
Environment
235874
GABM_Green_3P_NAT - Core Brand - General_CPMR_DSKT_Web_435874
Multiple