
Non-CM360-Integrated Tags: Creation, Implementation, and Reporting
Note: "CM360-integrated" refers to our platform's CM360 integration. If you're using CM360 as your primary ad server, please integrate your CM360 Campaign(s) and proceed with this tagging article instead.
If CM360 is not your primary ad server, please proceed with the tagging instructions below.
Overview
Upwave’s Tag Manager makes it fast and easy for you to create tags on-demand for measuring your campaign. We’ve worked with hundreds of media platforms to build a comprehensive tagging library that pass creative and placement-level details from your ad server directly into the Upwave platform. This allows you to achieve cut-level insights for monitoring the performance of your campaign.
This article shows you how to use Upwave’s Tag Manager and implement those tags successfully! You may also watch the video below, which gives you a full walkthrough of this process.
Measure Your Campaign with Upwave Tags
Create Your Tags
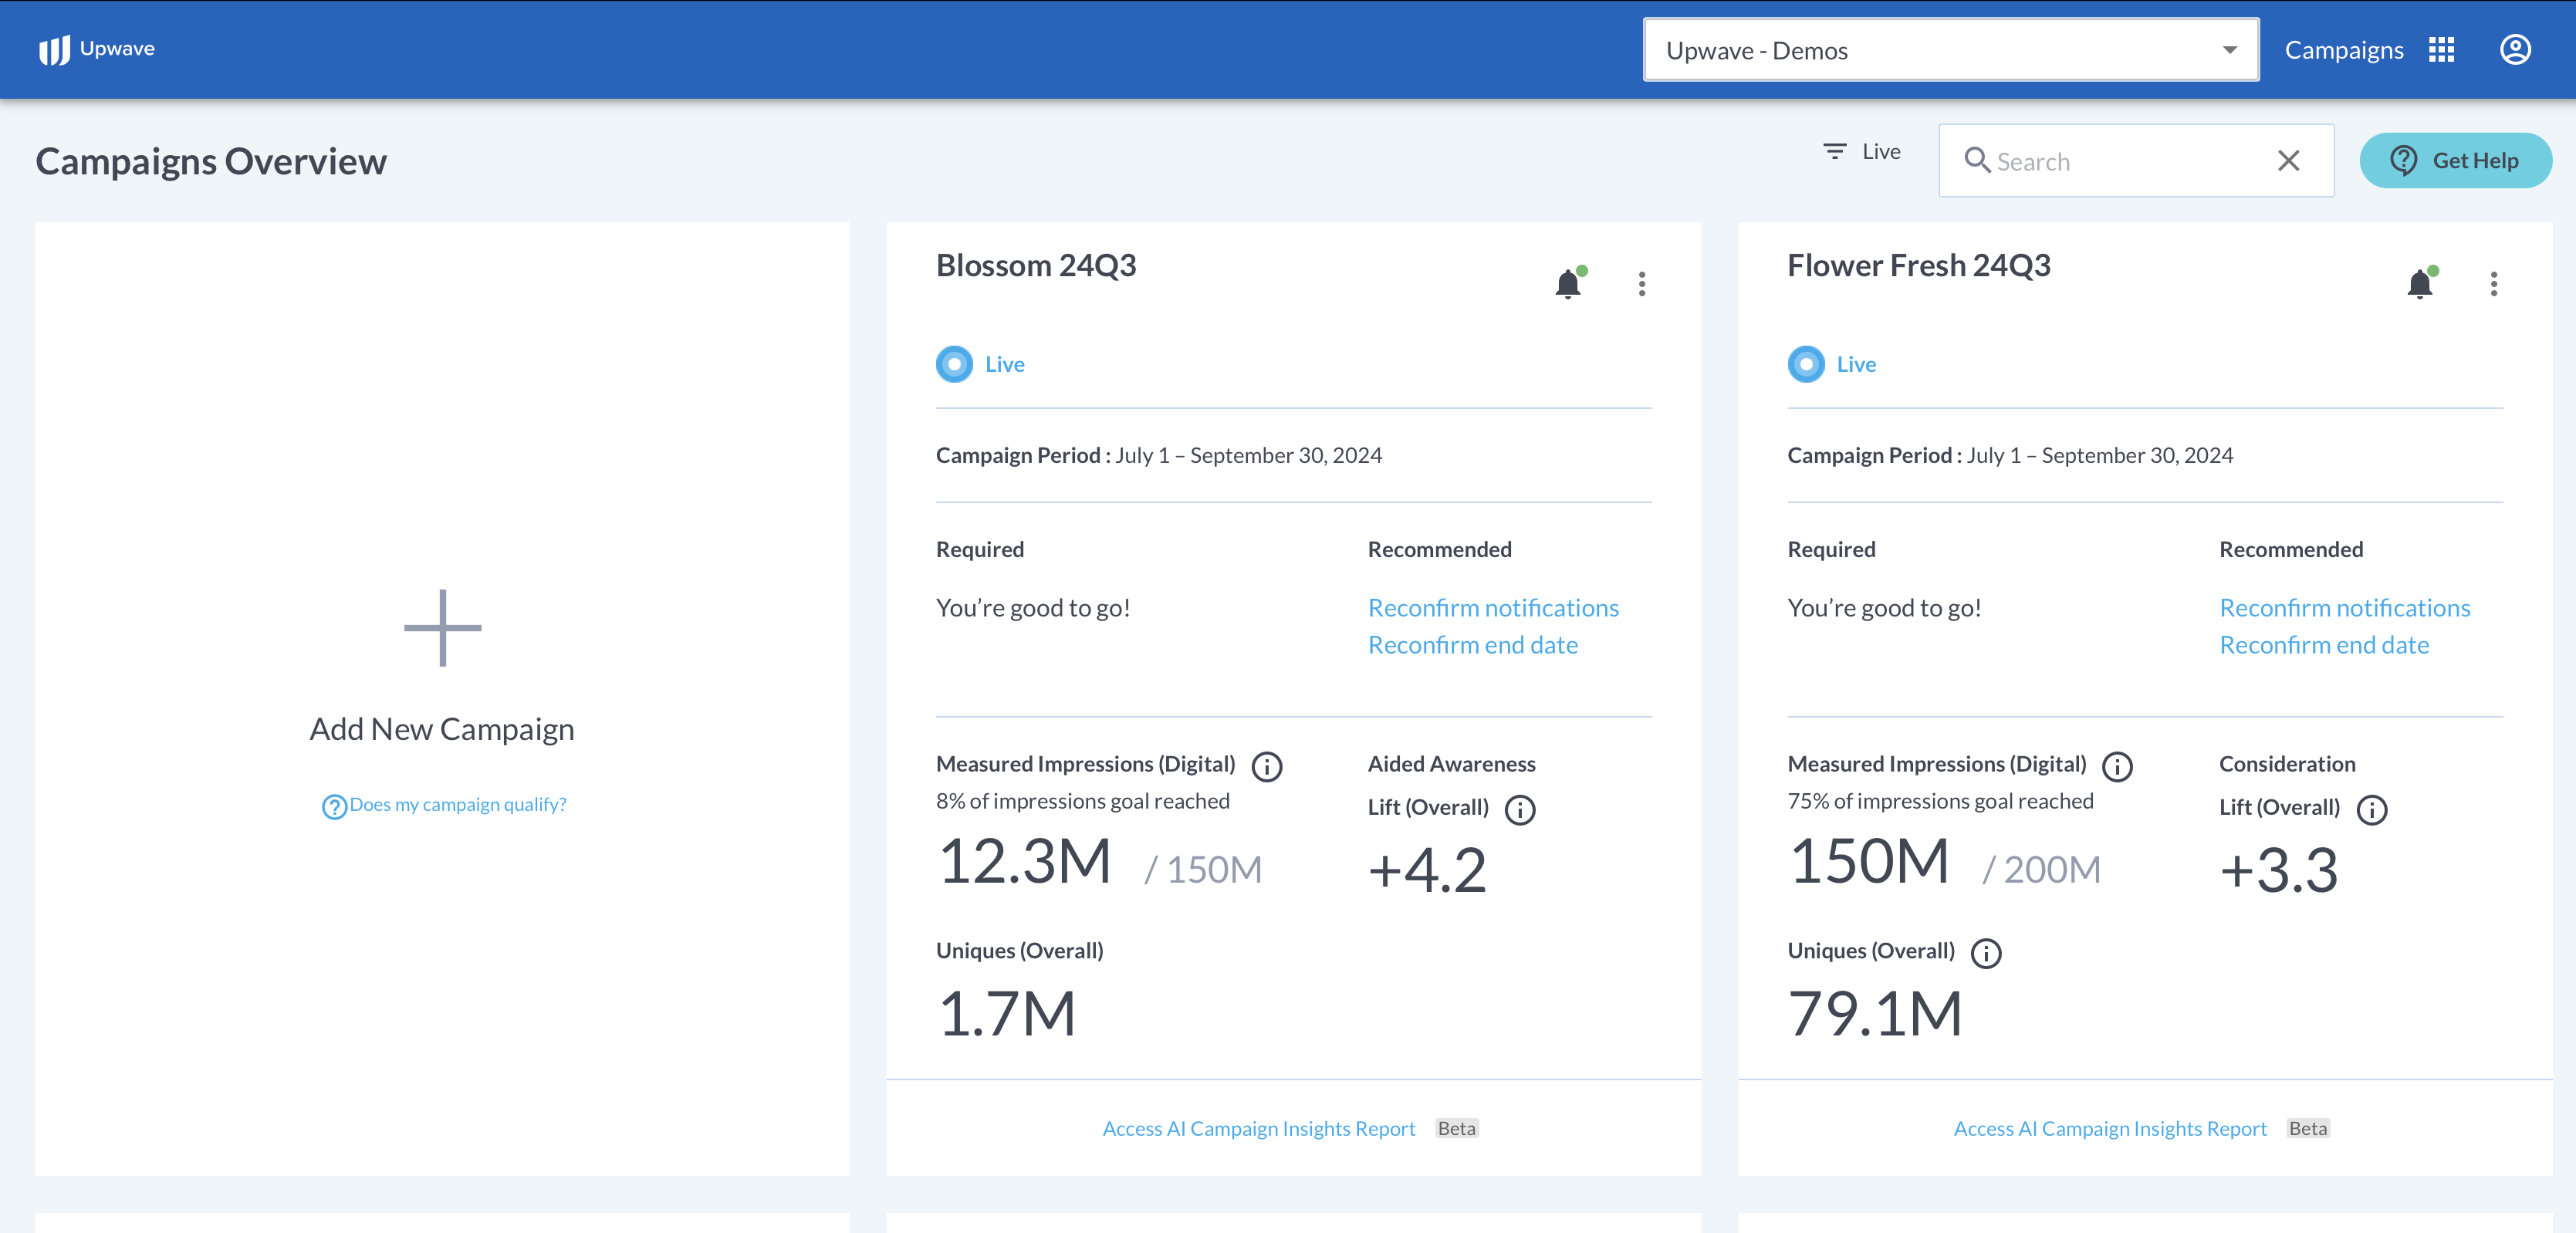
Log into your account on app.upwave.com. Here, you'll see any 'Campaign Cards' associated with your account:
Note: If you don’t have a login, ask the person who created the campaign to invite you to their Team using the Team dropdown in the upper-right of the platform. When they do, you’ll receive an email that you can use to login.
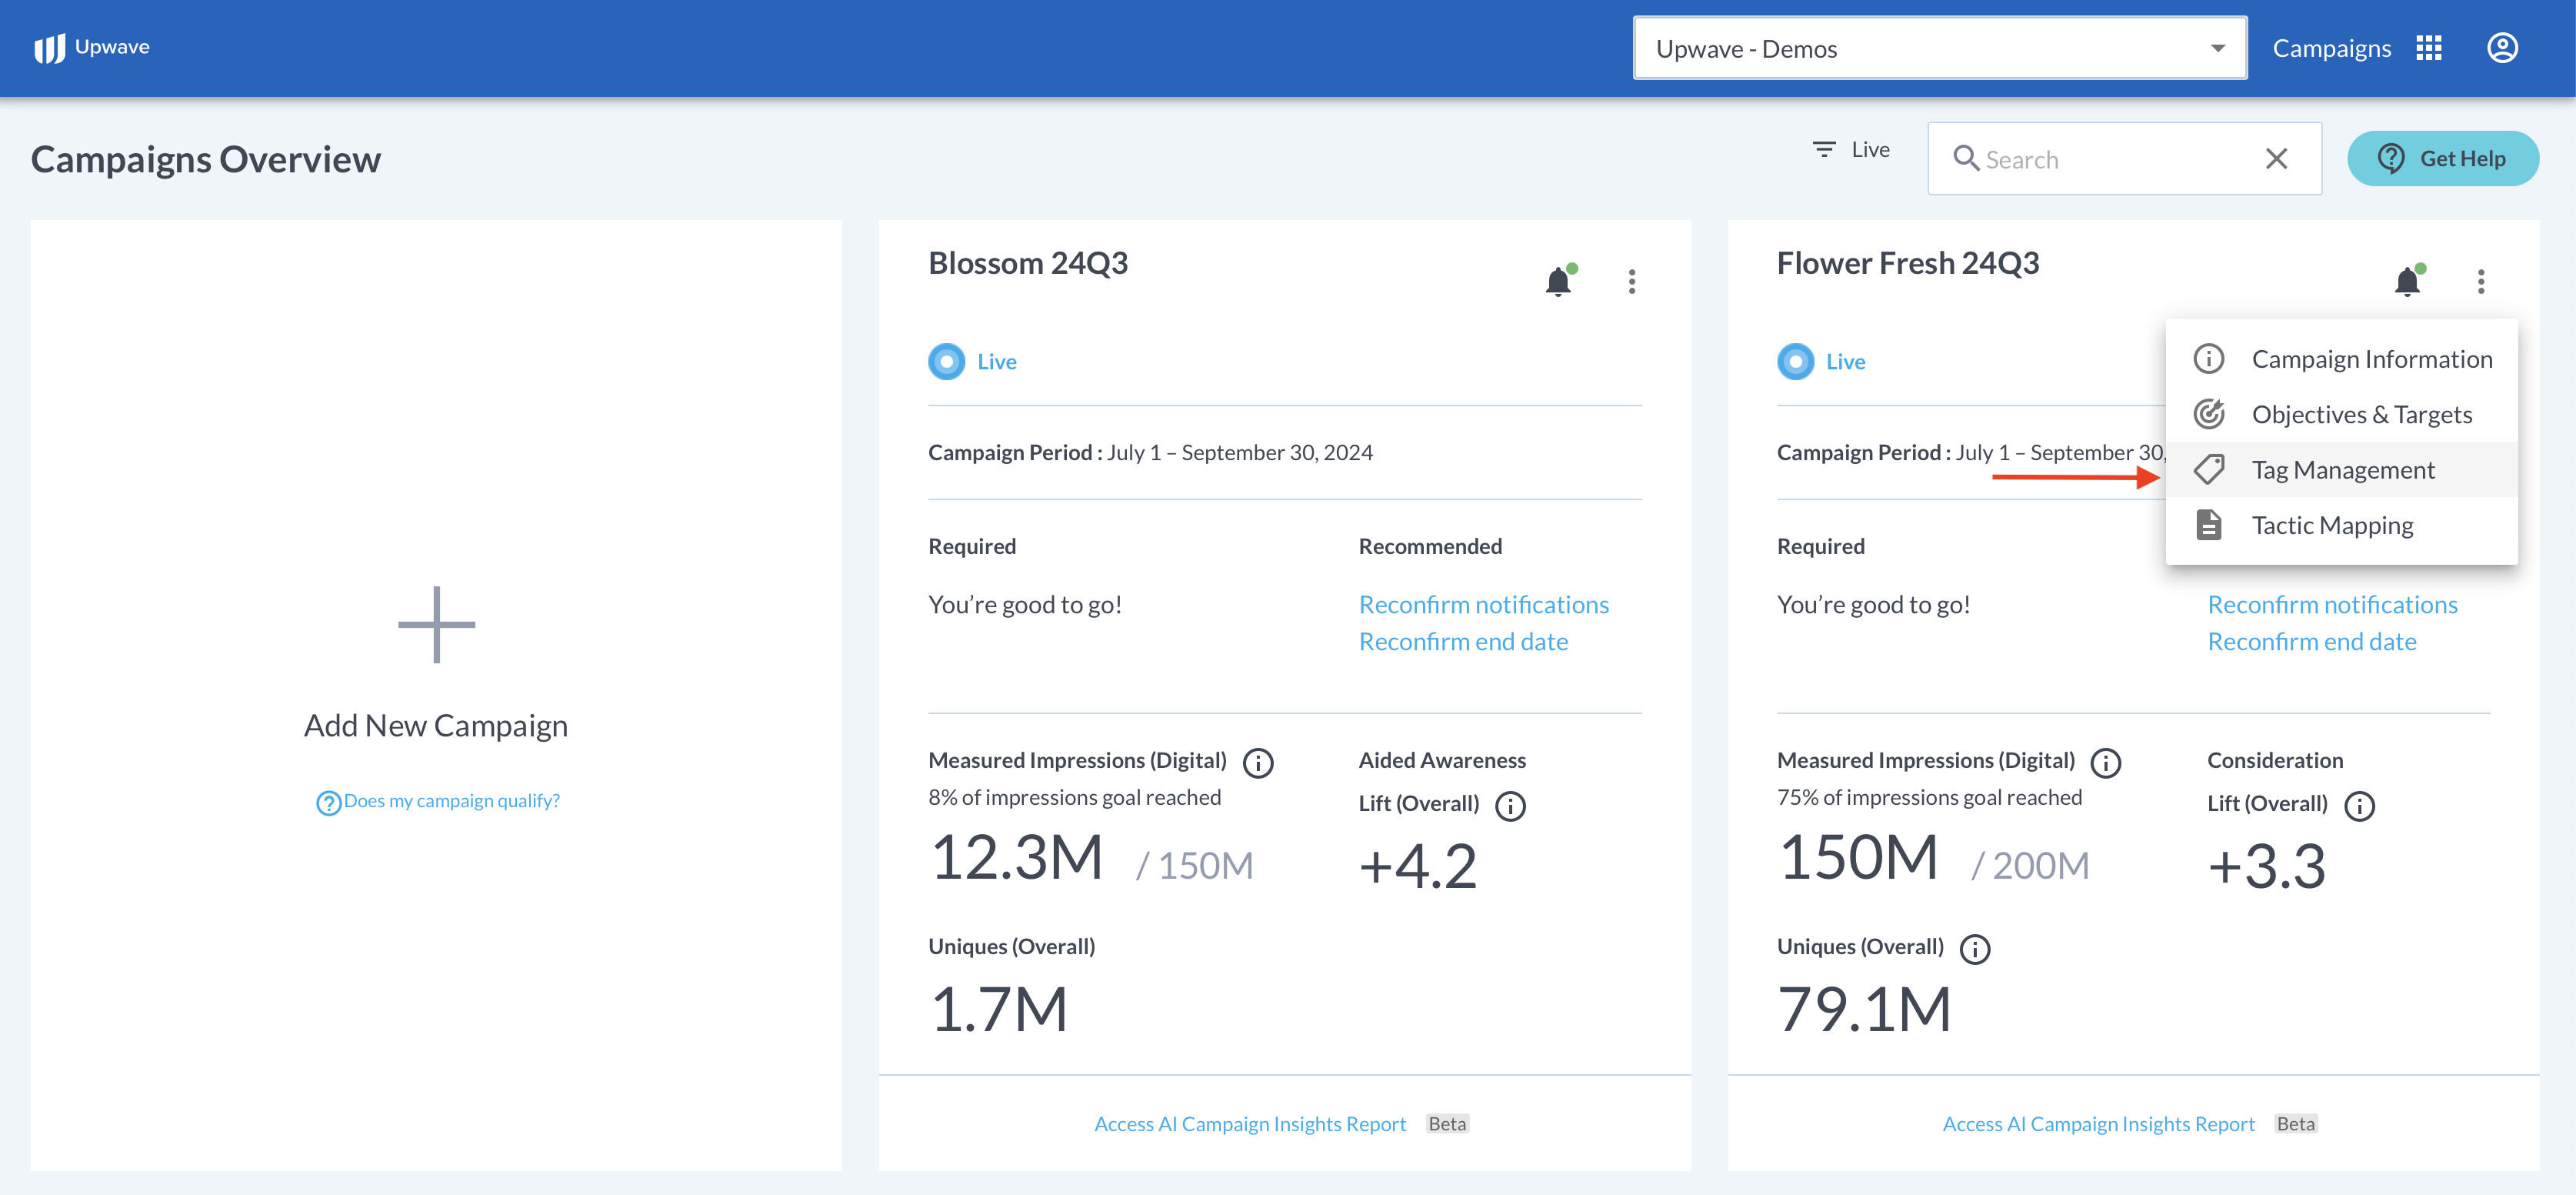
Click the ellipses in the top-right of the Campaign Card that you would like to create tags for. Then, select "Tag Management":
If this is the first time generating tags for that campaign, you'll be redirected to our non-integrated Tag Management page:
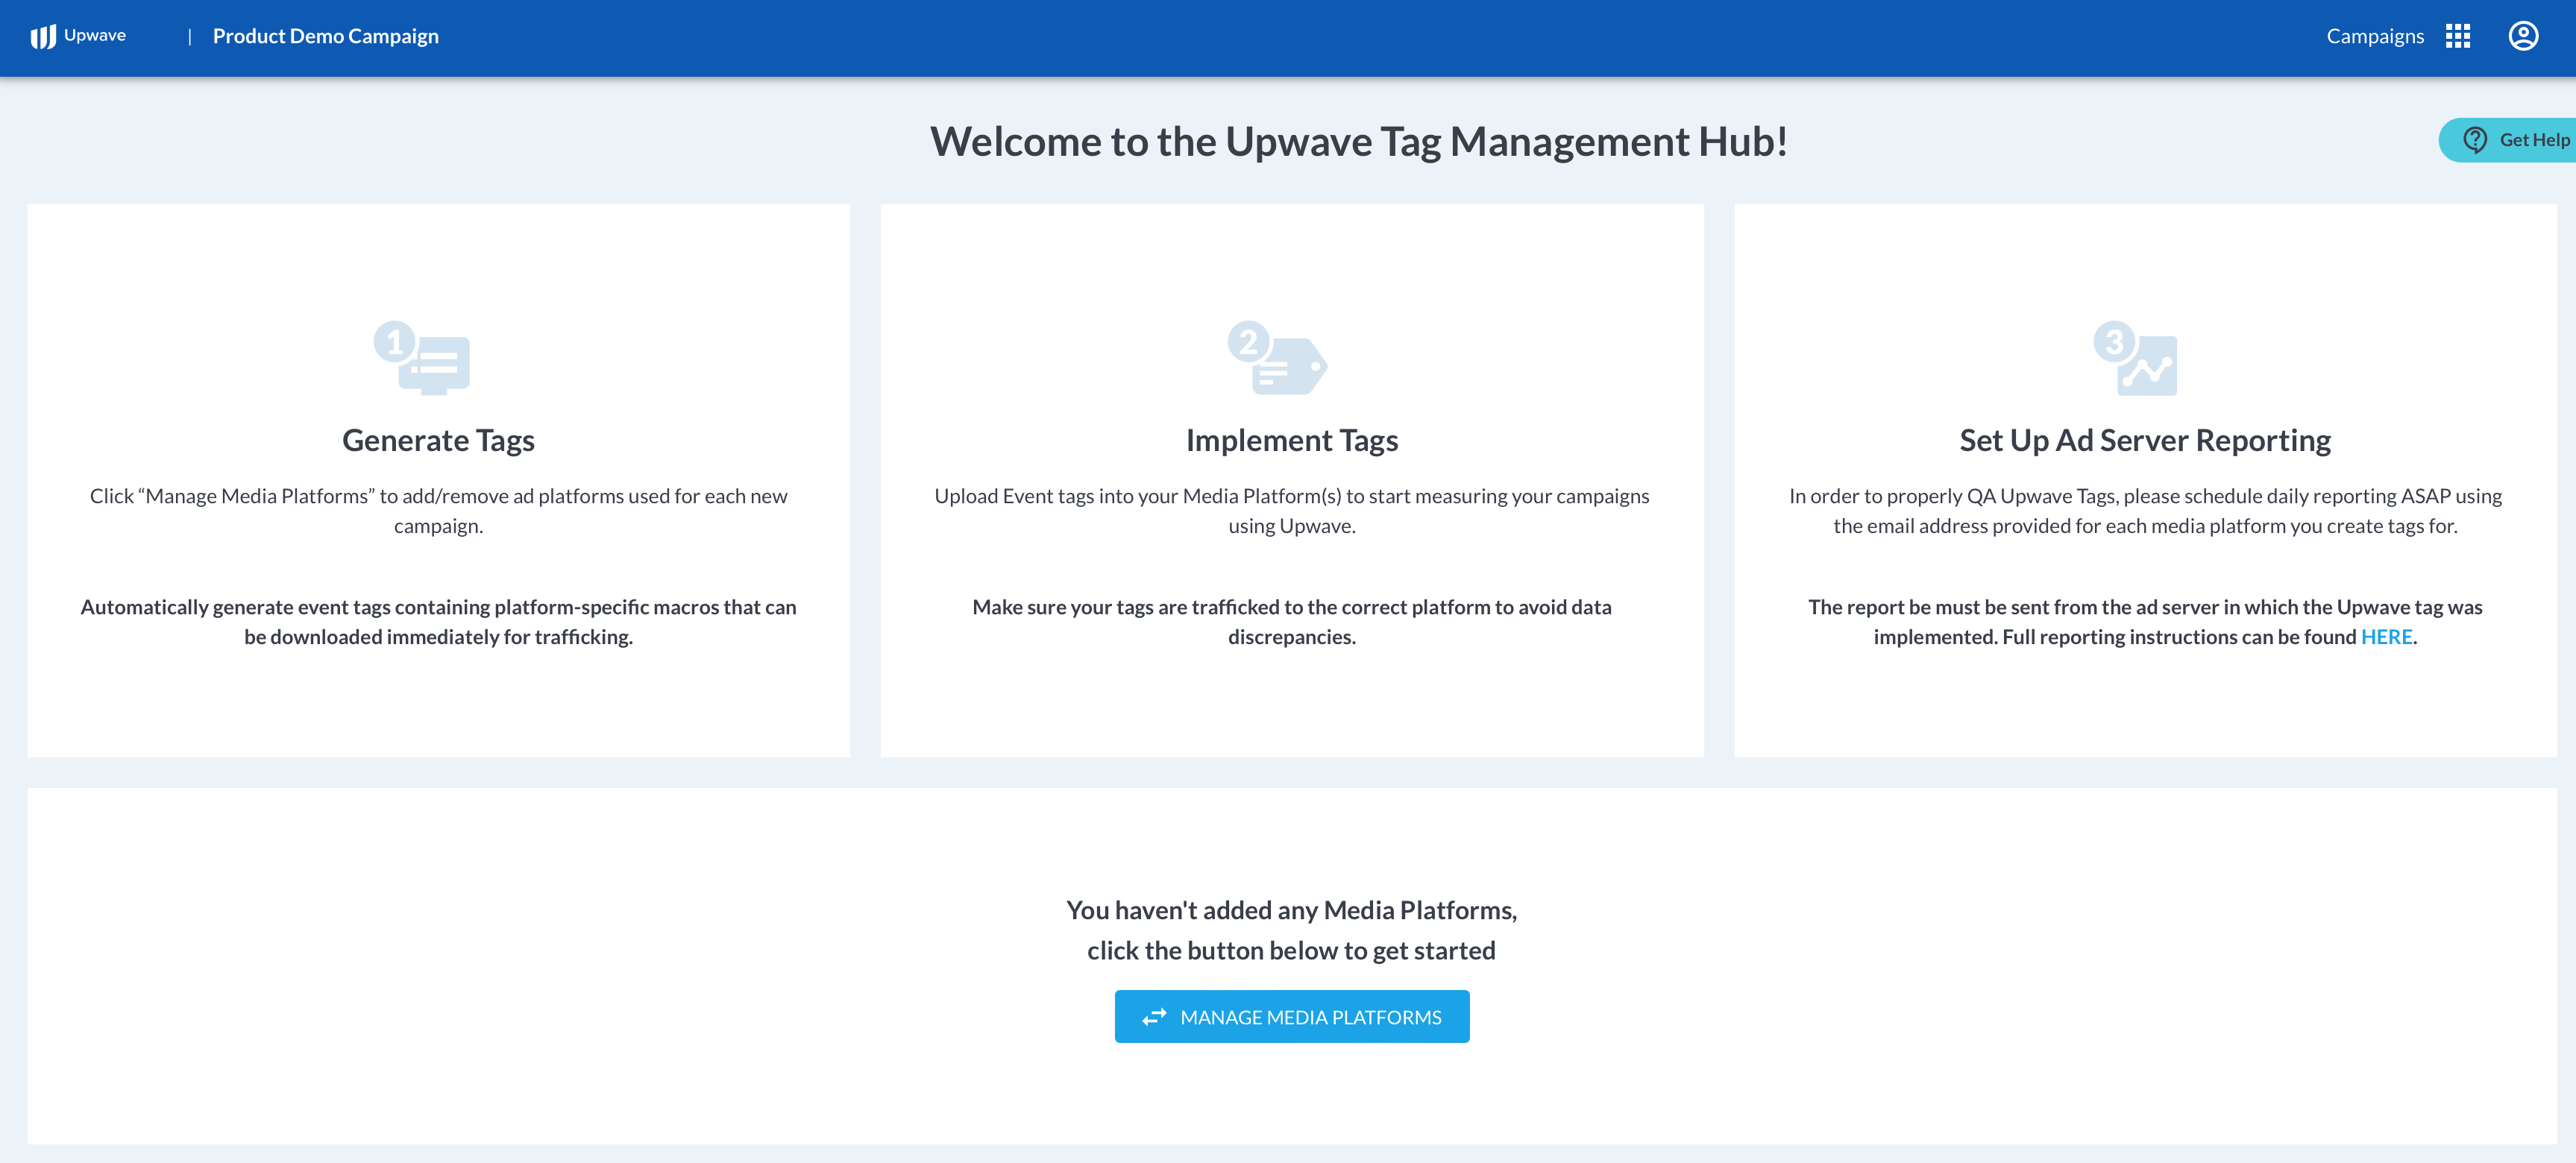
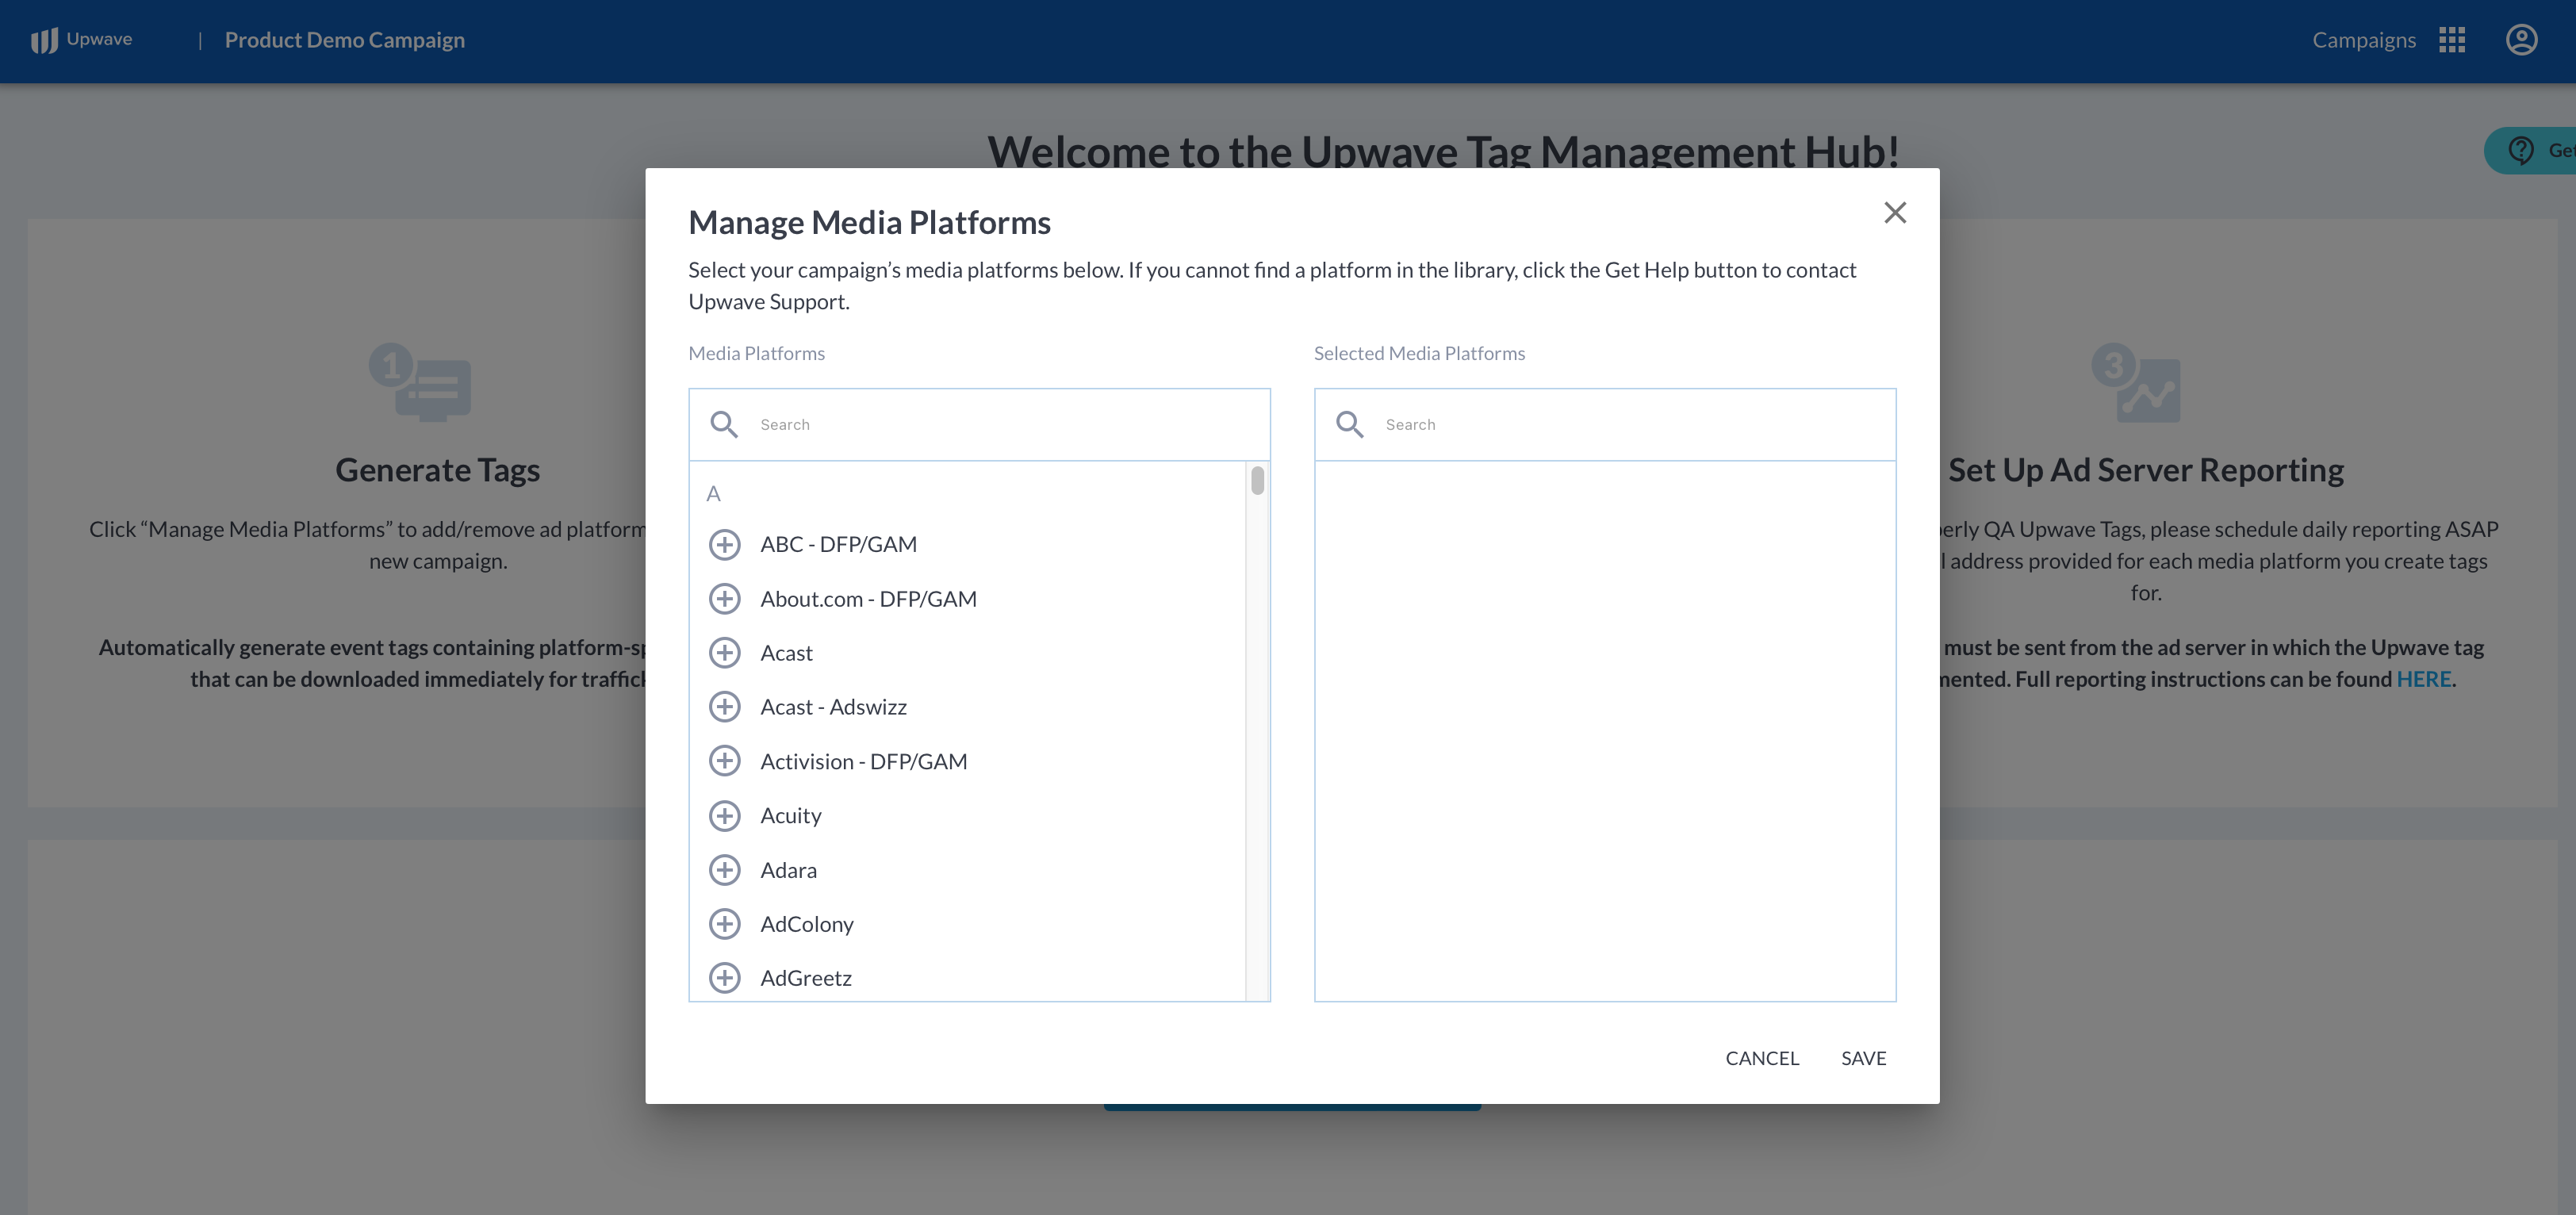
Click "Manage Media Platforms", where you can select the Media Platforms where tags will be implemented for that campaign. These Media Platform represent what ad servers/publishers that Upwave's tag code(s) will be physically copy/pasted into.
Once you've made your selections, your Tag Management page will update to reflect your Media Platforms (as seen below).

To retrieve your Upwave tag code(s), select the checkbox(es) next to your tag(s). Then click "Activate and Download Tags" (this is what triggers all of the routines and notifications mentioned above).
Please note that "Activating and downloading" tags triggers a variety of routines and notifications associated with QAing that tag.
As such, please only download tags if and when you plan on using them to avoid extraneous notifications to your Team.
If you're not sure, no problem! The Tag Manager is always available, so you can come back anytime once confirmed.
When you click "Activate and Download Tags", the Upwave Tag File will automatically download to your desktop (pictured below) and be linked to the corresponding campaign.
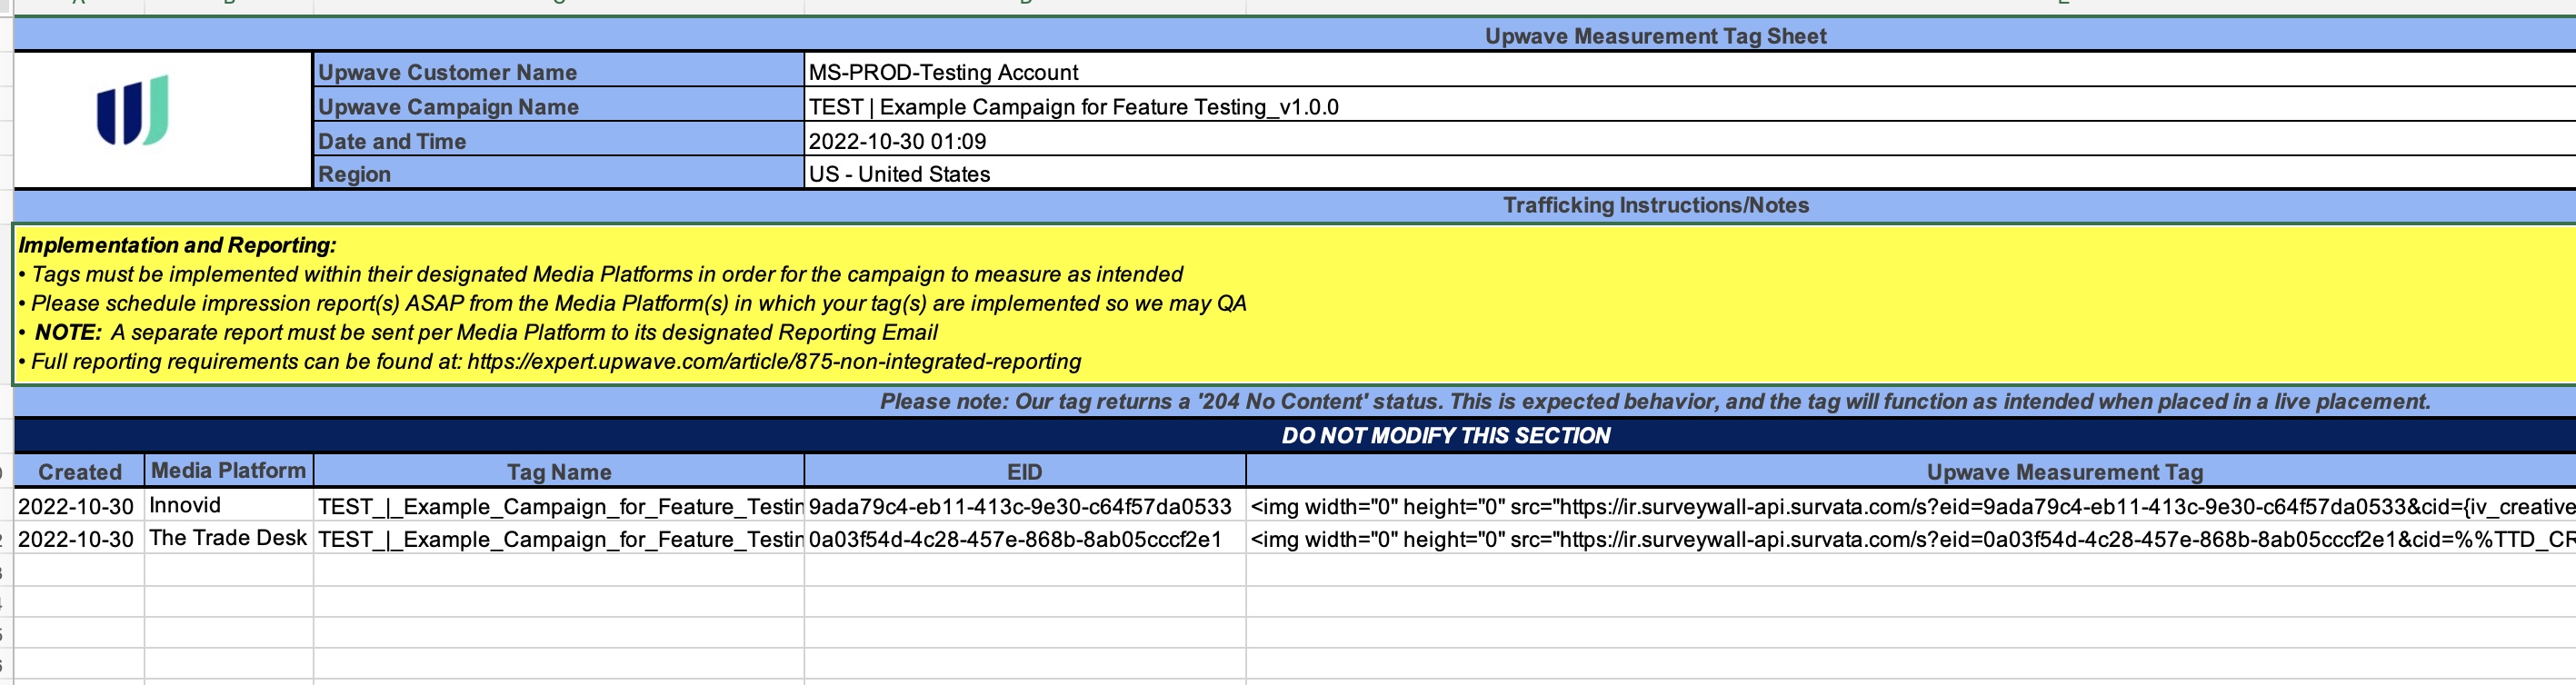
Within your Tag File, you'll find the following columns:
Created: This is the date that the tag was created.
Media Platform: This is the Media Platform in which that tag should be implemented.
Note: If the tag is implemented within a Media Platform that does not match this selection, it will not function correctly. This is because tags use proprietary macros that only expand when implemented within their designated ad servers. Please ensure you make the correct selections in your Tag Manager, and implement tags based on that selection, to avoid missed measurement.
Tag Name: This name is automatically generated by the platform, and can be used to quickly reference each tag.
EID: This is the unique identifier for each tag (you will also see this value in the tag code).
Upwave Measurement Tag: This is the tag code that you will implement within your ad server/publisher. It is a standard image tag.
Reporting Email: This is where you must schedule impression reports for each tag to ensure accurate measurement. Please see the section below, "Schedule Required Impression Reporting", for more information on how to set these up.
Implement Your Tags
Now that you have your tag(s), it's time to implement! Navigate to your ad server to implement the Upwave Measurement Tag (or distribute the Upwave Measurement Tag to your designated partner(s) that will be implementing).
Implementation instructions vary across ad server. We have assembled more detailed implementation instructions for our most common ad servers if these are the Media Platforms that you are working with: The Trade Desk (TTD), Google Ad Manager (GAM), and Campaign Manager 360 (CM360).
Tips for implementation
Tags must be implemented within the Media Platform specified on your Tag File. Tags won’t function properly in Media Platforms that they're not intended.
Confirm that the macros generated in your tag will pass back the IDs necessary for mapping your audiences (these are the first 2 macros listed after
&cid=in your tag code). We keep the most common macros on file, but it's always a good idea to confirm prior to implementation.The first macro is your Creative level macro. When this macro expands, it should produce IDs that you’ll map to Creative Level Dimensions - like Creative Concept and Banner Size.
The next macro is your Placement level macro. When this macro expands, it should produce IDs that you’ll use to map Placement Level Dimensions - like Audience and Environment.
Don’t modify the tag’s macros, or macro order, as it impacts how we parse your data. Tags must be implemented as provided in the Tag File.
The tag should be implemented on all placements you want to measure, and none of the placements you don’t.
Tags fire in sequential order, so ensure the tag is implemented within the top 4 firing positions for most accurate measurement.
Please note that when implementing, our tag returns a "204 No Content" status. This is a success code, not an error code. The tag will function as intended when placed in a live placement.
Schedule Required Ad Server Reporting
How Does My Tag Inform Ad Server Reporting?
Please configure impression reporting from within your ad server promptly after the Media Start Date you have inputted on your Campaign Information form for that campaign; this date informs our platform when to start QAing your tag(s). Reporting facilitates that QA (via Discrepancy Reports), as well as assists with mapping your audiences shortly after launch.
To better understand our reporting requirements, let's first examine what an Upwave Event tag looks like. Below is an example for DFP/GAM, which includes that ad server's default macros for Creative ID, Placement ID and Site ID:

The IDs that flow through your first 2 macros are what we map your audiences to:
Macro #1: Mapped to Creative Dimensions such as Creative Concept, Banner Size, etc. (in this example, the IDs that flow through %ecid! would be mapped here).
Macro #2: Mapped to Placement Dimensions such as Audience, Environment, Geo, etc. (in this example, the IDs that flow through %epid! would be mapped here).
Other ad servers may use different types of IDs (such as Ad Unit IDs or Campaign IDs), but the general concept remains the same: The IDs used to map your audiences are those that flow through Macro #1 and Macro #2. The only way we're able to identify those IDs, however, is through your reporting.
Reporting instructions vary across ad server. We have assembled more detailed reporting instructions for our most common ad servers if these are the Media Platforms that you are working with: The Trade Desk (TTD), Google Ad Manager (GAM), and Campaign Manager 360 (CM360).
Ad Server Report Requirements
Details | Notes/Comments | |
|---|---|---|
Delivery Address | Please send to the 'Reporting Email' designated for each tag's Media Platform (Fig.1). |
|
Delivery Cadence | Automated daily | |
Data Source | The report MUST come from the ad server in which the Upwave tag was implemented. | NOTE: If you're working with multiple partners and/or platforms, a separate report must be scheduled for each. For example, if you have a DFP tag and a TTD tag, you'll need to schedule 2 reports: 1x from DFP and 1x from The Trade Desk. |
Date Range | Campaign to Date (or Last 30 Days minimum) | |
Timezone | UTC (or GMT) | |
Filters | Please only include placements in which the Upwave tag was implemented. | |
| * IDs must match IDs coming through Macro #1 |
Fig. 1: Reporting Email
The Reporting Email for each tag can be found on your Tag Management page, as well as your downloaded Tag File. Your reports must be sent to these Reporting Emails in order for our system to find them.
Please do not send multiple reports to the same alias as that could result in the wrong report being used.

Suggested Reporting Dimensions/Metrics by Media Platform
Please find our Media Platform Repository HERE >> which includes the most commonly used Impression Report Dimensions and Metrics based on historical data for each platform.